
Chicken coop diy
I have been raising laying hens in the U.S. for decades. I have built coops that survived blizzards, coyotes, kids with baseballs, and one very stubborn goat. Let me walk you through simple, honest chicken coop DIY so your birds stay safe and your mornings start with fresh eggs, not headaches.
When I say chicken coop diy, I do not mean fancy blueprints or perfect social media photos. I mean boards that line up well enough, doors that actually shut in the wind, and nest boxes hens run to every morning. I will share what worked on my farm, what failed, and how you can mix DIY pride with a good ready-made coop when it saves time and money.
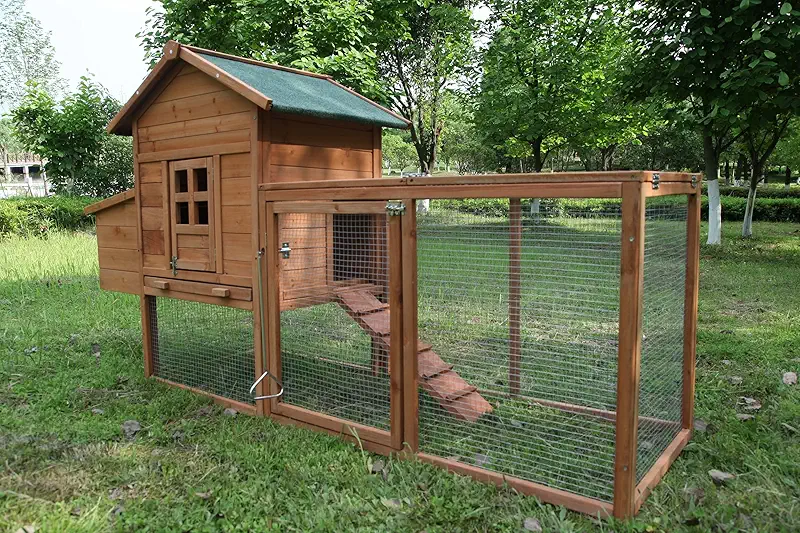
Why I Mix DIY With Store‑Bought Coops
Over the years I have built coops out of barn boards, pallets, and even a rusty old trailer. Some turned out fine. Some… well, the hens forgave me. What I learned is this: a smart chicken coop diy plan often blends your own work with a solid base or kit you can set up fast.
When a storm is rolling in and the fox tracks are fresh in the mud, pride takes a back seat to safety. I am not ashamed to say a few of my favorite coops started as pre‑built frames that I customized. I added better roosts, deeper litter, extra vents, and stronger latches. That way I kept my trusted layout while saving my back and my weekend.
If you are new to chickens, starting from a sturdy structure and “farmer‑tuning” it is a whole lot easier than reinventing the wheel with a saw you barely know how to sharpen. Think of it like buying a pickup and then adding the toolbox, not welding the truck frame yourself.
Build what you enjoy, but do not be stubborn. If a ready‑made chicken coop gives you a safe shell fast, use it. Then do the fun part of DIY: making it truly fit your birds, your yard, and your weather.
The 5 Things Your DIY Chicken Coop Must Get Right
I have seen coops with flower boxes, pretty paint, and little curtains. Hens do not care about any of that. They care about five simple things. If your chicken coop diy covers these, the rest is just decorating and tinkering.
1. Space that feels calm
Aim for at least 4 square feet per hen inside the coop if they also have a run. Crowded birds get cranky. Cranky hens peck tails, break feathers, and sometimes eat eggs. I learned that the hard way one winter when I was “sure” a dozen birds would fit in a tiny shed. They fit. Their patience did not.
2. Dry floor and roof
Damp litter is your enemy. Wet floors mean cold feet, ammonia smell, and sick lungs. Slope the roof, seal the joints, and keep the coop slightly higher than the ground so rain runs away. If you step in and your socks would complain, your hens will too.
3. Real ventilation
Fresh air matters more than perfect warmth. I keep high vents under the eaves on both sides, so moisture escapes but the breeze does not hit the birds right on the roost. In winter, I would rather wear another coat than shut the vents. Dry air keeps combs and lungs healthy.
4. Safe at night
A predator checks every weak spot: gaps, loose latches, rotten boards. Raccoons are clever, foxes are patient, and dogs can be impulsive. Use sturdy locks, small wire mesh, and solid doors. If a kid could open the latch without thinking, a raccoon probably can too.
The fifth thing is simple, but folks still miss it: easy chores. That is where a lot of chicken coop diy projects go sideways. Make sure you can clean without crawling on your knees, gather eggs without swearing, and refill feeders without banging your head. I say it with love: you are building for your birds, but you are also building for your tired future self on a cold Monday morning.
Using A Ready‑Made Shell As Your DIY Shortcut
A smart trick is to start with a solid chicken coop frame and then layer your own ideas on top. I have done this when a neighbor suddenly offered me a batch of young pullets, and I needed a safe place for them fast. Lumber prices were high, my time was short, and my wife had that look that says, “Do not tear apart another shed.”
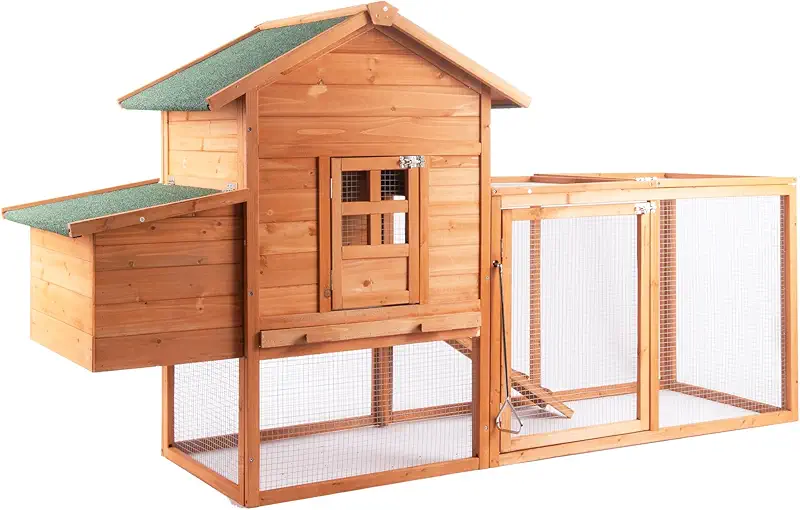
I brought in a pre‑built coop and treated it as my blank canvas. Here is how I usually “farmer‑tune” a store‑bought coop with some simple DIY adjustments:
- Add wider roosts so hens can cover their toes in winter.
- Reinforce the floor and corners where the wood meets the ground.
- Upgrade wire mesh to tighter, stronger hardware cloth.
- Install extra vents up high for better air flow.
- Build a simple roof over the pop door to keep rain out.
- Extend the run so birds have more scratching room.
That way, I get the backbone of the coop done quickly, but it still feels like chicken coop diy, not a flimsy little house that showed up in a box. The birds do not care who cut the first boards. They care that the coop feels steady, quiet, and safe.
Let me browse a bitPlanning Your Layout: Where Hens Actually Like To Live
Folks often draw their first chicken coop diy plan like a tiny house for people. Windows in the wrong places, nest boxes too high, and roosts right over the feeders. Chickens think different than we do. They want dark, quiet nests, roosts higher than the nests, and a simple path from door to perch.
Roosts: The Nighttime Highway
I set roosts higher than the nest boxes, about chest‑high on me, and wide enough for their feet. Two‑by‑fours on the flat side work well; hens can sit and cover their toes when it is cold. If you stack roosts like a ladder, leave enough space so the birds on top are not dropping “gifts” on the birds below.
Nest Boxes: Cozy, Not Fancy
Hens like nests that feel like a safe little cave. I keep them lower than the roosts so the birds do not sleep in there. One box for every three or four hens is usually enough. They will still argue over their favorite box anyway. I swear I have watched six hens wait in line for the same nest while the others sat empty.
Door on one side, feed and water near the entrance, roosts toward the back, nests off to the quieter wall. That way you can step in, grab eggs, refill feed, and be out again in about a minute on a cold morning.
Real‑World Building Tips From My Barn Yard
Let me share a few lessons that lumber and birds taught me the hard way. These little details make a big difference when you tackle your own chicken coop diy project.
Use screws, not just nails
Screws hold better as wood swells and shrinks. Years later, when you decide to move a wall or raise a roost, you will be glad you can unscrew instead of tear apart half the coop. My first coop was held together like a stubborn argument. Never again.
Think like a raccoon
If a raccoon can pull, push, or twist something, it will. Use sturdy latches that snap or lock, and cover any opening bigger than your thumb with tight mesh. I once watched a raccoon work a simple hook latch like it was cracking a peanut.
Build for your climate
In the northern states, you want more wind protection and maybe a clear panel for winter sun. In hot, southern weather, you need shade and extra air flow. The basic chicken coop diy ideas stay the same, but the roof slope, vents, and siding can change a lot by zip code.
Leave room to grow
Nearly everyone who starts with six hens ends up wanting twelve. If you build or choose a coop, think about how easy it would be to add a second run or bump out another four feet of space later.
My Favorite DIY Add‑Ons For Store‑Bought Coops
When I bring in a manufactured coop, I treat it like a good pair of work boots. They are fine off the shelf, but they get better once they have a little mud and some custom laces. Here are simple add‑ons I like to use with any base coop I bring onto the farm.


Stronger Run And Ground Protection
Predators do not just come from above. They dig. I like to run hardware cloth at least a foot down into the soil or out in a skirt along the ground. That way, anything that tries to tunnel hits wire instead of your flock. It is not pretty work, but it is quiet insurance.
Roof Over The Door
One of my early coops dumped rain right at the door. The hens would stand there and look at me like I was the landlord who forgot the front steps. Now I always add a small overhang or awning over the pop door and people door. Dry threshold, dry litter.
Removable Poop Boards
A simple board under the roosts catches most of the mess. I line mine with old feed bags or a thin layer of shavings so I can scrape it clean in a minute. It keeps the rest of the coop fresh, and your nose will notice the difference within a week.
All of these can be added to a plain frame you build yourself or a coop you bring in. That is the beauty of chicken coop diy — you are not locked into what came in the box.
Keeping Hens Happy: Feed, Light, And Routine
A coop is just the shell. What really keeps eggs coming is good feed, steady light, and a calm routine. A nervous, hungry hen will not lay well, no matter how cute the coop looks.
Feed And Water Placement
I keep feed and water near the entrance of the coop or out in a covered run. That way I can refill without stepping through every part of the flock. In winter, I bring the water inside to keep it from freezing up so fast. Spilled water far from the door is just a muddy headache waiting for you.
Light For Winter Eggs
Hens lay best with about 14 hours of light. In winter, I use a simple timer and a gentle light in the early morning, not late at night. Birds should still go to bed naturally with the sun. No strobe‑light barn raves, just a slow, steady glow that helps them keep laying without pushing them too hard.
Daily Rhythm
Birds love routine. If you open the coop at the same time each morning, they settle in. If you show up at random hours, slam doors, and move things around constantly, they stay jumpy. A calm flock is a laying flock, and your chicken coop diy setup should help with that, not work against it.
Cleaning And Maintenance Without Losing Your Weekend
A good coop is not the one that looks best on day one. It is the one that is still easy to clean five years later. I always design or choose coops with maintenance in mind.
Design For A Quick Clean
Big doors, removable panels, and simple corners matter. Fancy trim might look nice, but it gathers dust and cobwebs. If I can open the side of the coop, rake out bedding into a wheelbarrow, and have fresh shavings down in fifteen minutes, I call that a win.
Seasonal Checkups
Twice a year, usually spring and fall, I walk around every coop with a coffee in one hand and a screwdriver in the other. I tighten hinges, tap on boards, and look for chew marks. That little ritual has caught more trouble early than any gadget ever did.
- Are the vents clear and not blocked with dust?
- Do doors close snug without forcing them?
- Any soft or rotting spots in floor or walls?
- Is the roof still shedding water where it should?
- Any new gaps where wind or critters sneak in?
Build your chicken coop diy so these checkups are simple, not a full workout.
When To Build From Scratch And When To Start From A Kit
There is no prize for suffering through a build you are not ready for. I have the tools, the scars, and the stories, and I still choose a good base coop sometimes. Here is how I decide.
Good Times To Go Full DIY
- You already have lumber and tools on hand.
- You enjoy building and want a custom size.
- You have tricky terrain that needs a custom footprint.
- You are planning a larger flock right from the start.
Good Times To Start With A Ready‑Made Coop
- You are brand‑new to chickens and want to start small.
- You are short on time, but still want to customize.
- You do not have a truck or trailer for full lumber runs.
- You need a safe, decent coop up before the weather turns.
Either way, you can still call it chicken coop diy once you roll up your sleeves and make it your own. The chickens do not check receipts; they just enjoy the results.


Chicken Coop DIY – Common Questions
How big should my DIY chicken coop be for 6 hens?
For six laying hens, I like at least 24 square feet inside the coop, plus a decent run. That is 4 feet by 6 feet inside, or a bit bigger if you can swing it. More space means calmer birds, cleaner litter, and fewer pecking problems. If you are using a store‑bought coop as a base, make sure the listed capacity is realistic and think like a farmer, not a catalog picture.
Is wood or metal better for a chicken coop diy project?
I mostly use wood because it is easy to work with, easy to repair, and warmer to the touch in winter. Metal can last a long time but can sweat with condensation and get hot in full sun. If you choose metal panels, make sure you have good insulation and plenty of ventilation. Mixed builds, wood frame with some metal roofing, often hit a nice middle ground.
How do I predator‑proof a DIY coop?
Start at the ground and work up. Use hardware cloth instead of flimsy chicken wire, bury or skirt the wire around the run to stop digging, and make sure every window and vent has tight mesh. Add strong latches that raccoons cannot easily flip. Walk around your coop at night with a flashlight and look for any gap bigger than your thumb. If light escapes, something can probably get in.
Can I turn a pre‑built chicken coop into my own DIY setup?
Absolutely. That is one of my favorite options. Think of the pre‑built coop as your starting frame. Then you can strengthen weak spots, add better roosts and nest boxes, extend the run, tweak the ventilation, and change the layout to fit your yard. It still counts as chicken coop diy in my book, because you are the one who turns it from “generic” to “just right.”
What is the cheapest way to start with a safe coop?
The cheapest way is not always the lowest sticker price; it is the setup that keeps birds alive and laying without constant repairs. For many folks, that means a modest, well‑built coop from a trusted source, plus a few smart DIY upgrades: better wire, extra bracing, and a simple roof over the run. You save time, protect your flock, and still do enough hands‑on work to learn how everything fits together.
Ready To Shape Your Own Coop Path?
If you have read this far, you are already ahead of where I was when I built my first wobbly coop with more hope than skill. Remember, your birds do not need perfection. They need dry bedding, solid walls, calm air, and a keeper who cares enough to notice when something looks off.
Whether you cut every board yourself or start with a ready‑made frame and put your touch on it, your chicken coop diy journey is really about learning to see the world a bit like your hens do. Quiet corners. Safe perches. A good place to scratch and a safe place to sleep.
When you are ready to look over different coop styles, sizes, and layouts you can shape into your own setup, take your time and imagine your flock already settled inside. Hear the soft clucks, picture the morning egg basket, and choose the path that feels steady, not rushed.
Let me see them all