
Chicken coop siding
Chicken Coop Siding: What Keeps Hens Happy, Dry, And Laying
I’ve spent more mornings than I can count scraping ice off waterers and patching leaky boards. Let me walk you through how to choose chicken coop siding that actually stands up to weather, predators, and those opinionated ladies in feathers.
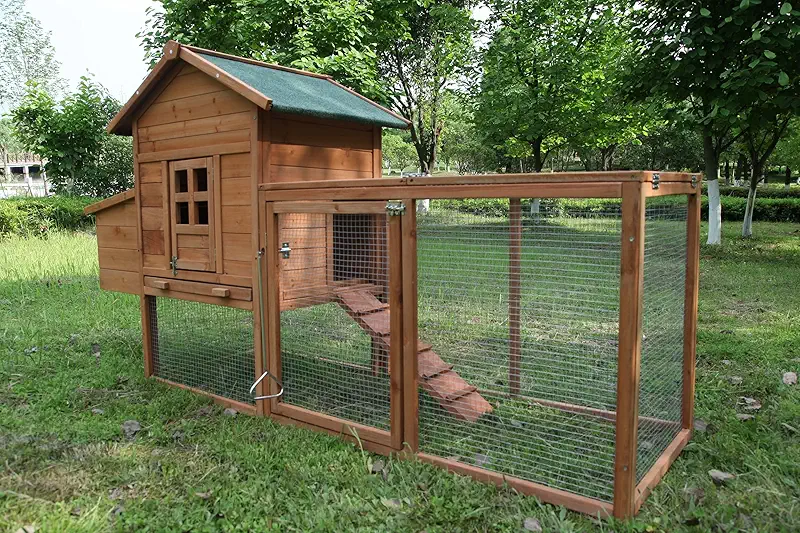
This is the kind of tight, weather‑smart chicken coop siding that keeps hens dry and calm through rough seasons. Click through if you want to look closer at setups like this.
Let me see moreI used to think a fresh coat of paint was all a coop needed. Then a February storm pushed rain straight through thin plywood and right onto my nest boxes. Wet bedding, grumpy hens, and not an egg in sight for three days. That’s when I learned: good chicken coop siding is as important as good feed.
Strong, tight siding keeps wind out, lets you control drafts, and turns a simple wooden box into a steady little home your birds can trust.
What Chicken Coop Siding Really Has To Do
Out here on my place, we get baking summers, sideways rain in the fall, and winters cold enough to freeze your nose hairs. A coop that looks cute on a sunny catalog photo isn’t always the coop that survives a January wind at 2 a.m. When I talk about chicken coop siding, I’m not talking about decoration. I’m talking about armor.
Your siding has four main jobs:
- Keep water out. If the walls leak, the bedding molds and the birds get sick.
- Block direct wind. Hens handle cold better than drafts. Big difference.
- Slow down predators. A raccoon only needs one weak spot.
- Last more than one season. You don’t want to rebuild every spring.
When I choose siding now, I picture the worst night of the year: rain blowing sideways, temps dropping, and me not wanting to leave the woodstove. If the coop siding can handle that night without my help, then I know I picked the right stuff.
Main Types Of Chicken Coop Siding I’ve Used
Over the years I’ve tried just about everything short of brick. Some worked fine, some rotted faster than a forgotten pumpkin. Here’s how the common choices shake out from a farmer’s point of view.
1. T1-11 Or Plywood Siding
This is that grooved wooden siding you see on a lot of coops and sheds. I built my first “real” coop with T1-11. It’s strong, looks like boards even though it’s panels, and goes up pretty quick.
The trick with plywood siding is sealing every edge. The top, bottom, and cutouts around windows love to soak up water. I learned the hard way when I skipped sealing the bottom edge. After two years, the lower six inches turned soft as a sponge.
2. Solid Wood Boards
Real boards make a coop that feels like a tiny barn. I’ve used rough-cut pine and old barn boards. Chickens do just fine with it, and I like how it weathers. But boards move as they dry. Gaps open, and suddenly your coop has built‑in wind tunnels.
If you go with boards, plan to:
- Use a tight overlap or shiplap style.
- Seal knots and cracks every couple of years.
- Add battens (thin vertical strips) over seams for extra weather protection.
3. Metal Siding
Metal, like what’s used on pole barns, is tough stuff. The coop I wrapped in metal siding has taken hail, wind, and one flying tree branch. The walls still look about the same as day one.
Pros: long‑lasting, sheds water, and predators can’t chew through it. Cons: can be noisy in the rain, and in full sun the walls heat up. I deal with that by having good roof overhangs and plenty of shade on the hot side of the coop.
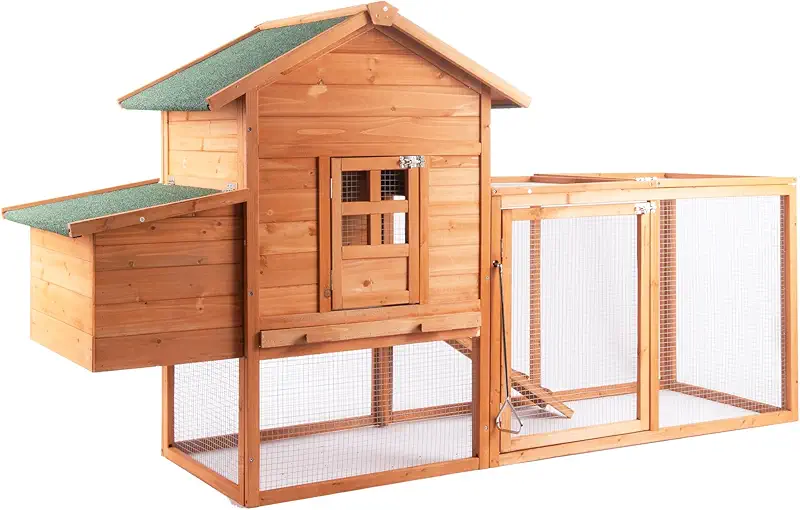

4. Vinyl Or Plastic-Type Siding
I was suspicious of plastic on a coop at first. Then one of my neighbors put up a little vinyl‑clad coop, and we had an ice storm that coated everything. His birds stayed dry and cozy, and the siding looked brand new when the thaw came.
Vinyl or plastic siding doesn’t rot, which is a big plus. You do need a solid frame behind it, because it’s more of a shell than a structural wall. I like it for folks who don’t enjoy scraping and repainting every few years.
5. Composite Panels And Smart Siding
Some of the nicer prefab coops and kits use engineered wood or composite panels. They’re designed to resist moisture and insects better than plain plywood.
The key here is reading the fine print about how the edges should be sealed and installed. If you do it right, these panels can last a good long while. Do it wrong, and they swell at the bottoms just like cheap plywood.
Weather, Climate, And Siding Choices
What works on my farm in the States might not be the perfect answer for yours, but the thinking process is the same. When you pick chicken coop siding, don’t start with looks. Start with your weather.
Ask yourself these questions first:
- Do I get more pounding rain or more dry cold?
- Do summer days bake the coop in full sun?
- Do I fight more rot or more rust where I live?
- Are windstorms common in my area?
- How often will I honestly maintain the coop?
If you get heavy rain and wet winters, pick siding that sheds water well and can be sealed tight. If you get brutal sun and dry air, look for something that won’t crack and warp. And if you know you’re not the type to repaint every couple years, choose materials that forgive a lazy weekend.
Keeping Hens Comfortable Behind Those Walls
Siding doesn’t work alone. It’s part of the whole coop system. I’ve had dry walls and still had miserable hens because I didn’t match the siding with good ventilation and layout.
Drafts High, Dry Birds Low
Your chicken coop siding should block wind at the level of the birds while letting air escape up high. I keep windows and vents above roost height, and I make sure the siding seams around them are sealed. This way, moist air gets out, but cold air doesn’t blast directly across sleeping hens.
Insulation And Thick Siding
On my older wooden coop, I added foam board insulation between the studs and then put siding over that. It made winter chores nicer, but the real winners were the hens: less frostbite on combs, and egg production stayed steadier.
You don’t have to insulate every coop, but thicker, sturdier siding always beats thin, flimsy panels. Think of it like a good jacket instead of a thin shirt.


My Simple Rules For Long‑Lasting Chicken Coop Siding
I’m not a fancy carpenter, but I’ve replaced enough rotten boards to earn a few opinions. Here are the rules I follow now when I build or upgrade a coop.
1. Keep Siding Off The Ground
Wood is like a sponge. If it touches damp soil or wet concrete all the time, it will soak up water until it gives out. I keep my chicken coop siding a few inches above grade, with a solid base or skids underneath.
2. Seal Edges Before Problems Start
Ends and cut edges are where water finds its way in. Before I nail a panel on, I run paint or sealer along the cut edge. It takes a bit more time on build day but saves me a lot of weekends later.
3. Flash And Overlap
Anywhere water can run behind the siding, it will. Over doors, windows, and seams, I like to use:
- Metal flashing where I can.
- Generous overlaps where panels meet.
- Caulk in the gaps the wind loves most.
4. Vent First, Then Pretty
A coop can look sharp and still be a moldy mess inside if the air doesn’t move. Before I worry about trim boards and cute paint colors, I make sure the siding, vents, and windows work together to let moist air out. Fresh air first, pretty second.
Predator Safety And Your Siding
I remember the first time a raccoon tested my coop. I thought my siding was solid, but that critter found the one soft corner where I had used thin scrap wood. Lost a hen that night, and I still feel bad about it.
Your chicken coop siding is part of your security system. Here’s how I treat it now:
- No thin OSB or flimsy paneling on exterior walls.
- Hardware cloth behind any vent opening, attached to framing, not just siding.
- Solid framing behind long runs of siding so it can’t flex or break in.
If I can’t push hard on a wall without it bending, I don’t trust it to keep a determined raccoon out. Simple as that.


Real‑World Example: Upgrading My Old Coop Siding
Let me tell you about my old “patchwork palace.” That coop started as a doghouse, grew with some scrap pallets, and finally got sheathed in the cheapest plywood I could find. It worked great during the first summer. By the second winter, the corners were soft, and one whole wall bowed in like a wet cardboard box.
I decided to do it right. I stripped off the worst of the old panels, replaced them with better exterior‑grade siding, and ran a proper drip edge along the roof. While I was at it, I added a small overhang on the windward side and re‑sealed around the windows.
The result? Inside the coop, it stayed drier, the bedding didn’t cake up as fast, and the hens started spending more time on the roost instead of huddling in corners. Did the new chicken coop siding magically make them lay more eggs overnight? No. But healthy, relaxed birds do keep laying steadier, and I sure noticed that.

This style of solid, well‑fit chicken coop siding is what I aim for now: tight seams, decent overhang, and no bare wood kissing the soil.
Quick Maintenance Routine For Siding
I keep a simple habit that saves me headaches. Twice a year—once in spring and once before winter—I walk around the coop with a coffee in one hand and a pencil in the other. Anything I notice that’s soft, cracked, or gapped gets a little mark. Later, when I have the tools out, I know exactly where to work.
Here’s what I check:
- Bottom edges of every wall panel.
- Seams where two pieces of siding meet.
- Caulk around windows, vents, and doors.
- Any spot where bedding or manure might rest against the wall.
It doesn’t take long, and it turns big repairs into small weekend projects. My hens may not say thank you, but they show it with clean feathers and steady eggs.
Chicken Coop Siding – Common Questions I Hear
1. Is thicker chicken coop siding always better?
Thicker siding usually means stronger walls and better protection, but it’s not the only thing that matters. I’d rather have a medium‑thick, well‑sealed siding with good framing than a thick board slapped on crooked. Balance thickness with how well you protect edges, block drafts, and keep the coop off the ground.
2. Do I need to insulate behind my siding?
Not always. In milder climates, solid siding and smart ventilation might be enough. In colder areas, I like a bit of insulation behind sturdy siding, especially near roosts. Just don’t seal it up so tight that moisture can’t escape. Dry air plus reasonable warmth beats a stuffy, wet coop any day.
3. Can metal chicken coop siding make my birds too hot?
It can if the coop sits in full sun with no shade and poor ventilation. On my metal‑sided coop, I use light colors, roof overhangs, and shade trees on the sunny side. Inside, I keep plenty of high vents open in summer. Done right, metal siding stays tough without turning the coop into an oven.
4. How often should I repaint or reseal wooden siding?
Around here, every 3–5 years is normal, depending on how rough the weather is. The main thing is to keep an eye on the sunniest and wettest sides of the coop. When the paint dulls or cracks and water stops beading, I give it another coat. A lazy afternoon with a brush beats rebuilding walls.
5. What’s one mistake to avoid with chicken coop siding?
The big one I see is folks leaving gaps “for ventilation” right where the birds sit, or letting siding reach down into mud and wet bedding. Ventilation should be up high, and siding should stay clear of the damp. Get those two things right, and the rest is just choosing the material that fits your budget and weather.
Ready To Look At Real Coops?
Reading about chicken coop siding is one thing, but seeing how different walls, roofs, and layouts come together can really help the ideas click. When I planned my last build, I spent a good while just studying how other folks did it.
If you’d like to wander through a bunch of coop setups and see which siding styles feel right for your flock, you can browse a wide range of ready‑made coops and kits. Look close at how the walls meet the roof, how high the siding sits off the ground, and how vents are cut into the panels.
Show me all coops