
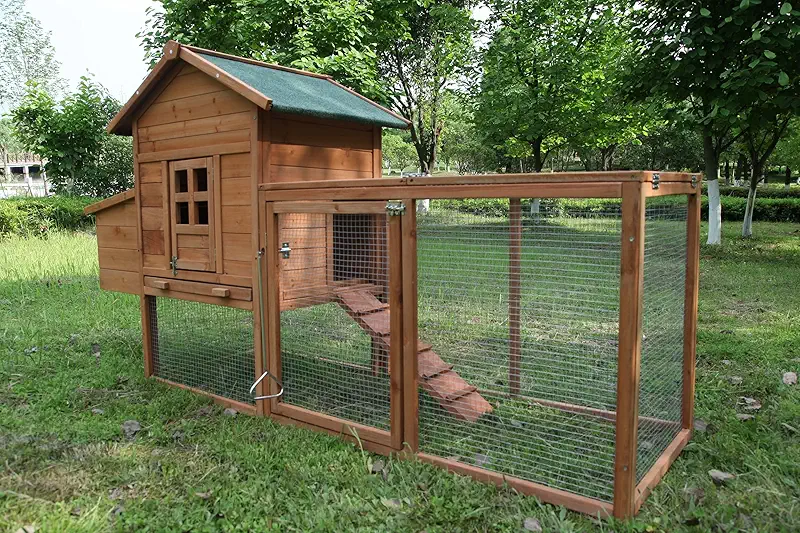
When folks ask me how to build a chicken coop, I always start with this: you are not just building a shed, you are building a little house for living, breathing ladies that will feed your family. Treat it like that and you will make better choices from day one.
Over the years I have hammered together crooked scrap-wood coops and also put up nice tidy ones from kits. The hens laid eggs in all of them, but some coops were a joy to care for and some made me mutter under my breath every single morning. I would like you to skip the muttering part.
Start with the basics: space, safety, and comfort
Before we talk about wood and screws, we need to talk about the birds. A good rule for laying hens is about 4 square feet of coop space per bird inside, and 8–10 square feet per bird in the run. If you cram them in tighter, they can start pecking, fighting, and getting sick. Chickens are polite only until they are crowded.
Think about how many hens you really want over the next few years. Most folks start with six, then next spring they see those fluffy chicks at the farm store and, well, chicken math happens. Build a little bigger than you think you need, or at least make the design easy to add onto later.
Choosing the right spot in your yard
Pick a place for your coop that has good drainage, some natural shade, and not too close to your house windows. Hens are wonderful, but a wet coop on a hot day can carry a smell that only a farmer could love. A slight slope is your friend; a low, soggy corner of the yard is not.
Face the main opening or people door toward the east or south if you can. Morning sun dries things out and gives the birds a warm start to the day. I like to keep the coop close enough that I can see it from the kitchen window. That way, when a stray dog shows up, I spot it fast.
Planning how to build a chicken coop that fits your life
You can build a coop from raw lumber, from scrap, or start with a pre-made frame or kit and improve on it. I have done all three. Truth is, most backyard folks do best with a simple, sturdy plan and a few well-chosen add-ons like extra locks, stronger wire, and better ventilation.
Must-have features I never skip
- Solid floor (wood or raised over earth) to keep rats and moisture away.
- Real hardware cloth, never thin chicken wire, on windows and vents.
- Roof overhang to keep rain from running down the walls and into doors.
- Nest boxes at a comfy height so you are not crawling on your knees for eggs.
- Roost bars higher than the nest boxes so hens do not sleep where they lay.
- Big clean-out door so a shovel and wheelbarrow fit without swearing.
When you look at any coop design or ready-made coop, walk through your day in your mind. Picture yourself going out before work, in winter, with a headlamp on. Can you reach the feeder? Can you open the egg door with gloves? If the answer is no, tweak the plan now.

Step-by-step: how to build a chicken coop frame
Let us talk about a straightforward wooden coop that fits six to ten hens. You can adjust the numbers, but the steps are about the same whether you are out on a farm like me or in a suburban backyard.
1. Set your foundation
Most backyard coops do fine on concrete blocks or skids made from 4x4s. I usually lay four or six blocks on level, packed soil, then build the floor frame on top. Keep the wood a few inches off the ground so it dries out and does not rot so fast.
Check for square by measuring corner to corner. If both diagonals match, you are square. If not, give a gentle farmer shove until it behaves. A square base makes the rest of the build a whole lot easier.
2. Build the floor and walls
For the floor, I use treated 2x4s for the outer frame and regular 2x4s across the middle as joists. On top I screw down exterior-grade plywood. I slope the floor just a touch toward the clean-out door so washing it out with a hose actually works.
For the walls, frame simple rectangles out of 2x4s. One side gets a big door for you; another side holds the pop door for the hens. Leave spaces for windows up high. I like to build the front wall taller so the roof slopes to the back. That way snow and rain go where I tell them to, not into my boots.

3. Add the roof
A simple sloped roof is just fine. I often use metal roofing because it sheds snow well and lasts a long time. Whatever you use, let it hang over the walls by a good couple of inches and use drip edge if you can. Leaks in a chicken coop always seem to drip right where the feeder hangs. I learned that the hard way.
Make sure there is a gap up near the roof line on at least two sides, covered in hardware cloth. That is where the warm, moist air escapes. Ventilation does more to keep your hens healthy than any vitamin powder you can buy.
Inside the coop: roosts, nest boxes, and layout
Think of the inside of the coop like a tiny studio apartment for hens. They need a place to sleep, a place to lay, and a place to eat and drink. If those spaces are laid out smart, everything stays cleaner and calmer.
Roost bars
Chickens like to sleep up off the ground. I use 2x4s turned flat so their feet sit on the wide side. That keeps their toes warm in winter. Set the bars about 18–24 inches off the floor, and give about 8 inches of space per bird.
Keep the roosts higher than the nest boxes. If the nests are higher, hens will try to sleep in them and you will end up with poop where eggs ought to be. Nothing kills your appetite for breakfast faster than that.

Nest boxes
One nest box for every three or four hens is usually fine. They will all pick a favorite box anyway and line up like kids for the school bathroom. Each box can be about 12 inches wide, 12 inches deep, and 12 inches tall.
I put a little lip on the front of the box to keep bedding in, and I use straw or wood shavings. Mount the boxes a bit lower than the roosts, and if you can, add an outside egg door. Collecting eggs in pajamas without stepping in mud is one of life’s overlooked pleasures.
Feeders, waterers, and bedding
I hang my feeder so the lip is about the height of the hens’ backs. That cuts down on scratching feed all over. Waterers I keep slightly lower so even the smaller birds can reach. In winter, I like a heated water base; in summer, I like two waterers so if one gets knocked over, they still have one.
For bedding, I mostly use pine shavings. Deep bedding, stirred now and then, keeps smells down and gives the birds something to scratch through. Once or twice a year, I haul the old bedding out to the compost pile. My garden has never complained.
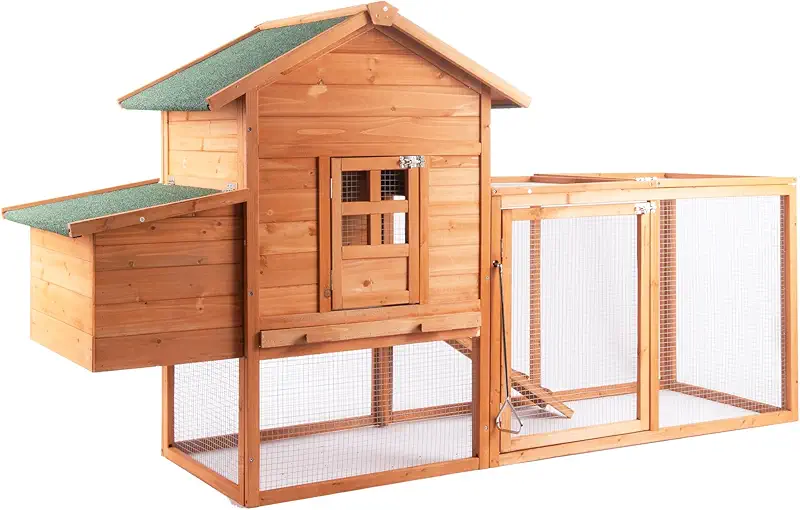
If you are not in the mood to measure and cut every stick of lumber, there are some solid ready-made coops and frames out there. I still like to strengthen them with better wire and latches, but they save a pile of time. When I helped my neighbor put hers together, we had the birds moved in by late afternoon and spent sunset on the porch instead of in the tool shed.
Take a slow look at different coop styles and imagine your own birds in them, in your climate, with your chores. A little time thinking now saves a lot of fixing later.

Building a safe chicken run
A good coop with a weak run is like locking the front door and leaving the back door wide open. Your run keeps the hens busy, lets them scratch and dust bathe, and keeps most trouble away.
Fencing and predator protection
For the run walls, I use hardware cloth for the lower few feet, and sometimes welded wire above that if I need to save a few dollars. I always run a skirt of wire 12–18 inches out along the ground, either buried a bit or pinned down. When a fox or dog tries to dig, it hits that wire and usually gives up for an easier meal somewhere else.
If you have hawks and owls, and most of us do, cover the top of the run with wire or sturdy netting. I have lost exactly one hen to a hawk in all these years, and it was before I covered the top. I learned that lesson fast.

Shade, dust baths, and boredom busters
Hens love a good dust bath more than I love my first cup of coffee. I always keep a corner of the run dry and loose with soil, sand, and a bit of wood ash. They roll and fluff and keep mites off themselves better than most powders will.
Add some shade in the run with a roof panel or shade cloth. Toss in a few logs or branches for them to hop on. A busy hen is a well-behaved hen. A bored hen starts plucking feathers, and then you have drama in the flock.

Weatherproofing your coop for real seasons
Out here, we get everything from July heat that makes the air hum to January winds that cut right through you. When you learn how to build a chicken coop, you need to think about both ends of the weather stick.
Summer: keeping birds cool
In hot weather, shade and ventilation are your best tools. I keep windows and vents open, all covered in hardware cloth, of course. I point a box fan across the outside of the run fence, not straight at the birds, just enough to move the air.
Light-colored roofs help reflect heat. I also freeze gallon jugs of water and set them in the run on the worst days. The hens hang around them like folks at the ice cream truck.
Winter: keeping birds dry
Cold does not bother chickens as much as damp drafty cold does. In winter I block direct drafts at roost height but leave high vents open so moisture can escape. Frozen combs often come from damp air more than low temperature.
I use extra straw in the run so they are not standing on bare, frozen ground. Inside the coop the deep bedding gives off a bit of gentle warmth as it breaks down. It is like a slow compost heater under their feet.
Daily care and keeping your coop clean
A smart design makes daily chores quick. Most days I spend about ten minutes in the coop: feed, water, eggs, quick look at the flock, done. Once a week I scrape the roosts and spot-clean the worst of the droppings.
A few times a year I do a bigger clean-out. I shovel bedding into a wheelbarrow, haul it to the compost, and let the sun hit every corner of the coop for a few hours. That simple routine keeps flies and odors down and keeps neighbors friendly.
Remember, the easier your coop is to clean, the more likely you are to keep up with it. Big doors, smooth floors, and roosts you can reach without gymnastics are worth every bit of effort during the build.
Frequently asked questions on how to build a chicken coop
1. How big should my chicken coop be?
I like at least 4 square feet of indoor space per laying hen and 8–10 square feet per bird in the run. More space is always better if you can swing it. If you know you will “just get a few more” next year, plan for that now and save yourself rebuilding.
2. Is it cheaper to build or buy a chicken coop?
If you already have tools and some scrap lumber, building from scratch can be cheaper. If you are buying every board and every screw, a solid pre-made coop or frame can come out close in price, and it saves a weekend of head scratching. I often blend the two: start with a basic structure and then add better wire, more vents, and sturdier locks myself.
3. What is the best floor for a coop?
My favorite is a raised wooden floor made from treated joists and exterior plywood, covered in deep bedding. It keeps rats and dampness out better than a bare dirt floor and is easier on my old back when I am cleaning. Concrete works too, but it can feel cold unless you keep plenty of bedding on top.
4. Do I really need hardware cloth instead of chicken wire?
Yes. Chicken wire keeps chickens in, but it does not keep hungry critters out. I have seen raccoons reach right through chicken wire. Hardware cloth with small openings is much tougher and keeps paws, teeth, and claws where they belong—outside the coop.
5. How much ventilation does a chicken coop need?
More than most people think. Aim for high vents and windows equaling about 10% of the floor area, spread around the coop. You want steady, gentle air flow up high without a cold breeze blowing across the roosts. If your windows fog up or the coop smells sharp when you open the door, you need more ventilation.